 Material Add Square Bar
See on another page: Square Bar Material window
- Step-By-Step
- Tips and Tricks
- Related Tools
1 . Click the Material Add Square Bar icon, which is pictured above. The icon can be found on the Material page > Add section. Select a member you want to add the material to.
▸ Preselect a member to enable the Members contextual page and click the Material Add Square Bar icon found in the Materials/Components section.
Alternative: Invoke Material Add Square Bar using the Find Tool by searching the command name and clicking the icon, which is pictured above.
Learn more about alternative methods for launching commands.
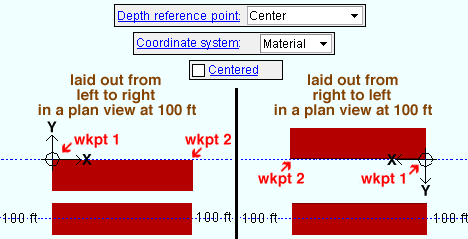
2 . The status line prompts, "Add: Material". Select a Locate option, then left-click (Locate) to place two work points that define the length (X material axis) of the square bar.
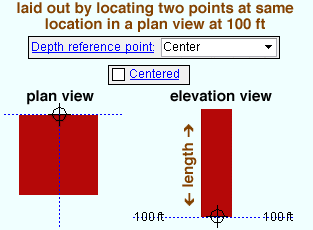
Alternative : Left-click ( Locate ) twice at the same location to define a cross section whose material reference point is at this location. The material's " Order length " is added toward you, out of the screen. The material's work line will be perpendicular to your current view (perpendicular to the plane of the screen).
3 . The Square Bar Material window opens. The settings in this window are filled out with default settings or the settings that match the last square bar that you added or edited in your current Modeling session. Press the "OK" button when you are done with the settings in this window.
Alternative : Press "Cancel" to repeat step 2.
4 . The Rotate Material window opens, and a preview of the square bar is shown in the model. Do one (1) of the following:
Alternative 1 : To accept the material's present rotation, press the "OK" button.
Alternative 2 : Change the material's rotational settings and then press "OK" if you want to rotate the material.
Alternative 3 : Press "Cancel" to back up to step 2. This stops the square bar from being added.
5 . The status line prompts, "Locate material dimension reference point". Left-click (Locate) the reference point at the desired location or Right-click (Enter) to place the reference point at the first work point you located in step 2.
6 . The status line prompts "Add: material". The Locate - Repeat - Return mouse bindings become active.
Alternative 1 : Repeat steps 2-5 if you want to add a square bar that is different than the one you just added.
Alternative 2 : Middle-click (Repeat) if you want to add a square bar that is exactly like the one you just added.
Alternative 3 : Right-click (Return) to add the square bar material to the model and end the command.
Note : If the material was added to a member with like members, the Material Add -- Options window appears and gives you the option to add the material to like members. After making your choice here and clicking OK, the material is added to the model and the command ends.
-
Since you added this material as a submaterial, you can double-click the material to re-open the Square Bar Material window.
-
The material will be shown on the member detail and listed in the member bill of material. The material will be shown on the detail and in the bill even if you do not bolt or weld the material to the member. Also, the material does not have to touch the member to be a part of the member.
-
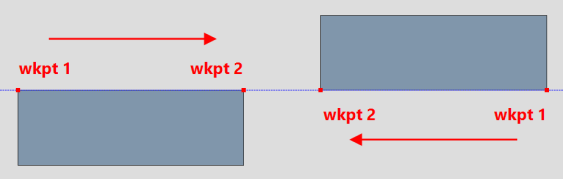
The order the points are selected affects the direction the width of the square bar goes. In a plan view, if the points are selected left to right, the square bar is added towards the bottom of the screen. If the points are selected right to left, the square bar is added towards the top of the screen.
- Square bar (topic)
- Square bar miscellaneous member (instead of legacy)
- Square Bar Material window (opens when you add square bar as a material or a legacy misc member)
- Add Material
- Show legacy miscellaneous members in member add screen
- Add Miscellaneous Member
- Miscellaneous Member Edit window (General settings and related topics)
- Miscellaneous Steel (Default misc. member types)
- Legacy Miscellaneous Member Edit window
- Settings on material windows for Add Legacy Miscellaneous Member
- Legacy Miscellaneous Steel (Legacy misc. member types)

